Map Posters
A poster-map tool that turns any place on OpenStreetMap into editable layers inside the editor.
Map Posters (overview) Extension 4 items #
A poster-map tool that turns any place on OpenStreetMap into editable layers inside the editor.
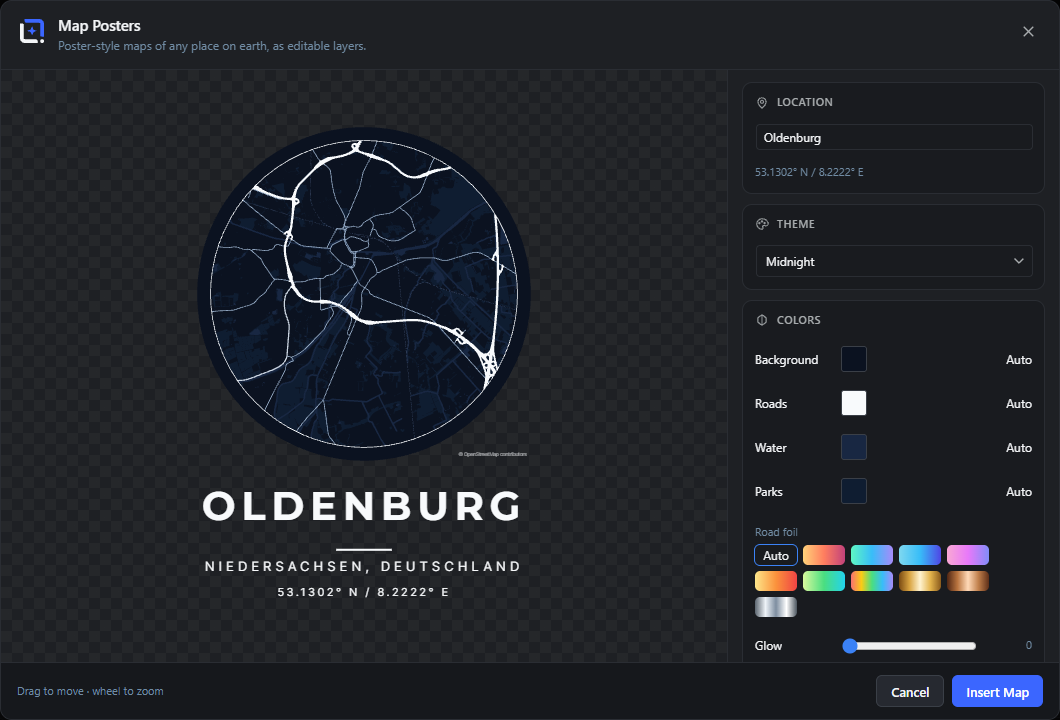
Poster-style maps of any place on earth, powered by OpenStreetMap: search a location, pick a design theme, pan and zoom the live vector preview, and add geocoded pins with routes and distances.
The streets themselves are yours to style: foil roads in gold, copper, chrome or color gradients, where the main arteries take the hot gloss band and the alleys sink into the rim, plus a neon glow slider that turns the city into lights. A shape mask frames the whole poster.
Open it from the Extensions menu. Insert the map with a classic title and coordinates block, all as editable layers, and reopen it anytime via Edit Map Posters. Map data is fetched server-side through the editor's privacy-friendly geo proxy and cached on your site.
Map Posters
#The extension registers a generator called Map Posters. Run it from the editor's generator or insert menu to open the studio, or use Edit Map Posters on an existing map layer to reopen it on the exact same spot.
Tip. Editing a map layer restores every setting: theme, colors, zoom, pins and shape.
Map Posters (dialog title)
#The heading shown at the top of the studio modal. It always reads Map Posters next to the editor brand badge.
Dialog subtitle
#A one-line hint under the title. When inserting a new map it reads Poster-style maps of any place on earth, as editable layers.; when editing an existing map it reads Adjust the map, the layer updates in place.
Close
#The x button in the top corner closes the studio without inserting or changing anything. Pressing Escape or clicking the dimmed area outside the dialog does the same.
Live map preview Extension 7 items #
The large canvas on the left shows the exact composition that will be inserted, and you interact with it directly.
The preview renders the map plus the title text block in document coordinates, so what you see is what lands. It updates in place as you change any control.
You navigate the map by dragging and scrolling on the canvas itself. Small pans and zooms reuse cached data, so most moves need no network at all.
Drag to move
#Press and drag anywhere on the map to pan to a new area. The centre latitude and longitude follow your drag and the map re-fetches detail as needed.
Tip. Panning inside already-loaded data is instant; new areas trigger a short load.
Wheel to zoom
#Scroll the mouse wheel over the map to zoom in and out. Scrolling up zooms in (smaller radius), scrolling down zooms out (larger radius).
Drag a pin
#If a pin sits under your pointer, dragging moves that pin instead of panning the map. Release to drop it at the new location.
Tip. Pins are added from the Pins panel and always start in the map centre.
Empty prompt
#Before a place is chosen, the canvas shows Search for a city, address or landmark to start the map. as a placeholder.
Loading map data
#A Loading map data indicator appears over the preview while the geo proxy fetches OpenStreetMap detail for the current view.
Status messages
#Short notices float over the preview for busy, error and truncation states. Examples: Very dense area: some detail was skipped., The map service is busy, retrying, Very large area: showing fewer details. and Could not load map data.
Tip. Errors show in red; informational notices are neutral.
Attribution (on the map)
#The line © OpenStreetMap contributors is inserted as its own text layer named Attribution, placed over the map. It is not painted into the map image itself, so keep that layer: OpenStreetMap data is licensed under the ODbL and the credit has to stay visible on anything you publish.
Location (place search) Extension 3 items #
Search for any city, address or landmark to point the map, using OpenStreetMap's Nominatim geocoder through the editor proxy.
The Location panel is the starting point. Type at least two characters to get matching places, then pick one to centre the map there.
On the very first place you pick, the studio also chooses a sensible starting zoom based on the place type (city, town, village, suburb).
Search a place, e.g. Hamburg
#The text field where you type a place name, address or landmark. Results appear as you type; press Enter to accept the first result.
Tip. Search runs through the server geo proxy (Nominatim), so the browser never contacts OpenStreetMap directly.
Search results
#A dropdown list of matching places under the search box. Each row shows the place name in bold and its region or full display name below. Click a row to select it.
Coordinates readout
#A small line under the search box showing the live centre coordinates of the current view, formatted like 53.5440° N / 9.9870° E. It updates as you pan and zoom.
Theme presets Extension 10 items #
Ten curated color themes that restyle the whole map with one click; picking one also clears any custom color overrides.
The Theme panel is a grid of ten swatches. Each theme is a complete palette for background, water, parks, roads (from strong motorways to faint paths), text and pin color.
Selecting a theme resets the individual Colors overrides so you get the clean preset look. You can then tweak single colors afterwards.
Minimal
#A clean light theme on a pure white background with dark grey roads. Best for bright, editorial posters.
Midnight
#A dark navy theme with light roads and a sky-blue pin. This is the default theme when you open a fresh map.
Blueprint
#A deep blue, technical-drawing look with white roads and a warm yellow pin. Evokes an architect's blueprint.
Terracotta
#A warm cream background with earthy brown roads and a clay-red pin. A soft, sunny Mediterranean feel.
Forest
#A dark forest-green theme with pale green roads and a yellow pin. Good for parks and nature areas.
Neon
#A near-black purple background with glowing cyan and magenta roads. A bold, synthwave night look.
Vintage
#An aged-paper cream with muted brown roads and a deep red pin. A classic antique-map feel.
Golden
#A black background with gold roads and a gold pin. A luxurious, high-contrast night poster.
Rose
#A soft blush-pink background with wine-red roads and a rose pin. A gentle, romantic palette.
Ocean
#A pale, airy theme with strong blue water and a coral pin. Suits coastal and harbour maps.
Colors Extension 8 items #
Theme colors, custom overrides, and the v1.12 foil gradients and glow for the streets.
The Colors panel lets you fine-tune the current theme without leaving it. Each row shows a swatch (the editor's color picker) plus an Auto reset.
Changing a single road color is smart: Map Posters spreads it across all road classes by fading toward the background, so one swatch still gives a coherent light-to-dark road hierarchy.
Background
#Sets the map's base fill color, behind water, parks and roads. Overrides the theme background until you press Auto.
Roads
#Sets the color of the strongest road class (motorways). The other road classes (primary, secondary, minor, path) are automatically derived by fading this color toward the background.
Water
#Sets the fill and line color for seas, lakes, rivers and streams. Overrides the theme water color until reset.
Parks
#Sets the fill color for parks, woods and other green areas. Overrides the theme green until reset.
Auto
#The small Auto button on each color row removes your override and returns that color to the theme's value. Its tooltip reads Back to the theme color.
Tip. Switching to a different theme clears all four overrides at once.
Road foil
#Paints the streets with a curated gradient instead of the theme road colors - ten presets including gold, copper and chrome foils. Gold streets on black is the classic. Auto returns to the theme colors.
Color flow
#How the gradient maps onto the streets: By road class gives main arteries the hot gloss band while alleys sink into the rim (instant depth), Across the poster runs one gradient over the whole map.
Glow
#A neon halo under the main roads - the city reads as lights at night. Strongest on the dark themes; the route line glows along.
Map options Extension 13 items #
Controls for zoom level, line weight, the poster shape mask and which map layers are drawn.
The Map panel holds the geometry and layer controls. The zoom slider mirrors wheel zoom, the line weight scales all strokes, the shape grid crops the map to a frame, and the checkboxes toggle individual OpenStreetMap layers.
Buildings only load when you are zoomed in close, so that toggle disables itself at wider radii.
Zoom
#A slider that sets how much area the map covers, from a tight neighbourhood to a whole region. The readout shows the current radius in metres or kilometres. It stays in sync with wheel zoom on the preview.
Tip. Zooming also changes how much road and building detail is loaded.
Line weight
#A slider that scales the thickness of every road, rail and water line at once. Lower values give a fine, delicate map; higher values give a bold, graphic one.
Shape
#A row of ten icon buttons that crop the map into a frame shape. Choose Square for no crop, or one of the masks: Rounded, Circle, Pentagon, Heart, Hexagon, Diamond, Triangle, Arch or Star. Shaped maps outline their shape in the road color or foil - the heart gets its heart line, matching Star Map Posters.
Square (shape)
#The default shape: no crop, the map fills its full square frame. Internally the none mask.
Tip. Pick this to keep straight edges and full corners.
Rounded (shape)
#Crops the map to a rounded-corner square (a squircle). A softer frame that still fills most of the area.
Circle (shape)
#Crops the map into a full circle centred in the frame. A classic round map medallion.
Heart (shape)
#Crops the map into a heart outline. Good for sentimental places like a hometown or wedding location.
Hexagon (shape)
#Crops the map into a point-up hexagon. A modern, badge-like frame.
Water
#Toggles the drawing of seas, lakes, rivers and streams. Turn it off for a land-only map.
Parks and woods
#Toggles the fill of parks, woods and other green areas (and sand or beach fills). Turn it off for a more abstract, monochrome map.
Railways
#Toggles rail lines, drawn with cross-tie dashes so they read instantly as railways.
Footpaths
#Toggles the faintest road class (footpaths and tracks). Turn it off to reduce clutter and keep only real roads.
Buildings
#Toggles building footprints. These load only when you are zoomed in close; when unavailable the checkbox is disabled and its label changes to Buildings (zoom in closer).
Tip. Zoom in until the label reads plain Buildings to enable it.
Pins Extension 6 items #
Add labelled marker pins to the map, connect them with an optional route line and show the total distance.
The Pins panel lets you mark places on the map. Each new pin lands in the middle of the map and you drag it into position on the preview.
Every pin can carry a text label. Two or more pins can be joined by a straight or curved route line, with an optional total-distance pill.
Add pin
#Adds a new marker pin at the current map centre, named Pin 1, Pin 2 and so on. Drag it on the preview to place it exactly. If no place is chosen yet, it warns Search for a place first.
Pins land in the middle of the map, drag them into place.
#A helper line under the Add pin button reminding you that new pins appear in the centre and are positioned by dragging on the preview.
Label (pin)
#A text field on each pin row that sets the caption drawn next to that pin on the map. Leave it empty for a pin with no text. Placeholder text is Label.
Tip. Labels render in the theme text color with a background-colored outline for legibility.
Remove pin
#The x button on a pin row deletes that pin and its label. Its tooltip reads Remove pin.
Route
#A dropdown that draws a dashed connecting line between your pins in order. Choose None for no line, Straight line for direct segments, or Curved line for a gentle arc between points.
Tip. A route needs at least two pins to appear.
Show total distance
#When a route is drawn, this checkbox adds a pill showing the total great-circle distance along the route, placed at the midpoint of the longest segment.
Text block Extension 8 items #
The title, subtitle and coordinates that are inserted alongside the map as separate editable text layers.
The Text block panel appears only when inserting a new map (not when editing an existing one). It composes a classic map-poster caption that lands as real text layers you can edit, restyle or move afterwards.
The title and subtitle prefill from the place you searched, and support dynamic variables like {{post.title}} so the poster can adapt per post in dynamic templates.
Layout
#Chooses where the caption sits. Classic poster places a centred title, divider and subtitle below the map; On the map overlays the title in the map's lower corner; No text inserts the map alone.
Title
#The main heading text, drawn in uppercase Montserrat bold. It prefills with the selected place name and stops auto-updating once you edit it by hand.
Tip. Insert variables like {{post.title}} with the variable button next to the field.
Subtitle
#A secondary line under the title (for example the region or country), drawn in uppercase Inter. It prefills with the place region and stops auto-updating once edited.
Variable button
#A small picker next to the title and subtitle fields that inserts dynamic tokens such as {{post.title}}. Because the caption becomes normal text layers, these resolve per post when the poster runs in a dynamic template.
Variables hint
#An explanatory line reading Variables like {{post.title}} resolve per post when the poster runs in a dynamic template. It appears under the text fields when the variable picker is available.
Text size
#A slider that scales the whole caption (title, subtitle and coordinates) up or down together. Use it to balance the text against the map.
Coordinates line
#A checkbox that adds a coordinates line to the caption, showing the map centre like 53.5440° N / 9.9870° E. It appears as its own text layer named Coordinates.
Divider (inserted layer)
#In the Classic poster layout, a short horizontal rule is inserted between the title and subtitle as a shape layer named Divider. It is drawn in the theme text color.
Panel section headings Extension 6 items #
The six labelled headings that divide the Map Posters sidebar into control blocks.
Map Posters's controls sit in the right-hand sidebar under six section headings. Each heading names the block of controls beneath it. They are labels only, not clickable, but they tell you where each setting lives.
Location
#Heading over the place search field and the live coordinates readout. Everything under it sets which spot on earth the map is centred on.
Theme
#Heading over the grid of ten preset color themes (Minimal through Ocean). Pick a tile to recolor the whole map at once.
Colors
#Heading over the four color override rows: Background, Roads, Water and Parks. Use these to tweak a theme's individual colors.
Map
#Heading over the map-shaping controls: Zoom, Line weight, Shape and the feature toggles (Water, Parks and woods, Railways, Footpaths, Buildings).
Pins
#Heading over Add pin, the list of added pins, the Route selector and the Show total distance toggle.
Text block
#Heading over the poster text controls: Title, Subtitle, the variable button, Text size, Layout and the Coordinates line toggle.
Tip. This whole section is hidden when you reopen an existing map, because editing only re-bakes the map image, not the text layers.
Route options Extension 3 items #
The three choices in the Route dropdown that draw a connecting line through your pins.
When you have two or more pins, the Route dropdown decides whether and how they are joined by a line. Pins are connected in the order you added them.
None
#No line is drawn between pins. Each pin just marks its own spot.
Straight line
#Joins the pins in order with straight segments, like a direct point-to-point path.
Curved line
#Joins the pins in order with a gentle curved arc instead of straight segments, for a softer travel-route look.
Tip. Pairs well with Show total distance for a trip poster.
Text block layout options Extension 3 items #
The three choices in the Layout dropdown that decide how the title, subtitle and coordinates sit around the map.
The Layout dropdown in the Text block section controls where the poster text goes. It only appears when you are inserting a new map.
Classic poster
#Puts the map in the upper part of the canvas with a centred title, a short divider line, the subtitle and the coordinates stacked underneath. This is the traditional map-poster look.
On the map
#Places the title and coordinates directly over the map, with no separate text band below it, so the map fills more of the canvas. A 3x3 grid appears with this layout and puts the block wherever you want it; the default is the lower left.
No text
#Inserts only the map image with no title, subtitle or coordinates text layers. Use it when you want to add your own captions.
Keyboard and mouse shortcuts Extension 3 items #
The keyboard and pointer actions that are not printed on any button.
A few Map Posters actions have no visible control. They work through the keyboard or by clicking outside the dialog.
Escape
#Closes the Map Posters dialog without inserting anything, the same as pressing Cancel.
Click outside the dialog
#Clicking the dimmed area around the dialog closes Map Posters without inserting. Clicks inside the dialog are ignored.
Enter (in the search box)
#Pressing Enter while typing in the place search selects the first matching result, so you can search and pick without using the mouse.
States, inserted layers and messages Extension 10 items #
State-dependent labels, the names Map Posters gives inserted layers, and the status messages it shows while working.
Some labels only appear in a particular state, and inserting a map creates layers with set names. Map Posters also shows short status messages over the preview while it loads or renders.
Buildings (zoom in closer)
#When you are zoomed too far out for building footprints, the Buildings toggle is greyed out and its label changes to this. Zoom in until it re-enables to draw buildings.
Back to the theme color
#Tooltip on the Auto reset button beside each color row. Clicking Auto drops your custom color for that element and restores the current theme's own value.
Coordinates
#Name of the inserted text layer that holds the latitude and longitude line. It appears in the Layers panel after Insert Map when the Coordinates line toggle is on.
Tip. This is the layer name, distinct from the Coordinates line toggle and the live coordinates readout in the sidebar.
Map
#Inserted map layers are grouped under a group named Map: <place>, and the baked map image inside it is named Map <place>. Rename or reorganise them like any other layer.
Pin
#Each new pin is pre-named Pin 1, Pin 2 and so on. Type in the pin's label field to give it a real name.
Edit Map Posters
#Because the inserted map layer stores its settings, selecting it later and choosing Edit Map Posters reopens the studio on the exact same place, theme, pins and zoom. The primary button then reads Update Map and re-bakes the image in place.
Very dense area: some detail was skipped.
#Shown when a location has more map data than can be drawn cleanly. Some minor detail is dropped, but the map still renders.
Very large area: showing fewer details.
#Shown when the zoomed-out area is too big for full detail. Map Posters automatically reloads that area at a lower detail level.
The map service is busy, retrying
#The shared OpenStreetMap data service is rate-limited in waves. When it is busy, Map Posters waits and retries automatically up to two times before reporting a failure.
Map Posters needs WunderPaint 1.144 or newer (geo proxy).
#Shown if the host editor is too old to provide the server-side geo proxy that Map Posters relies on. Update WunderPaint to use the extension.