Route Visualizer
Any GPX file becomes a poster: the route, the elevation, the stats and the typography of one run.
Overview Extension #
Any GPX file becomes a poster: the route, the elevation, the stats and the typography of one run.
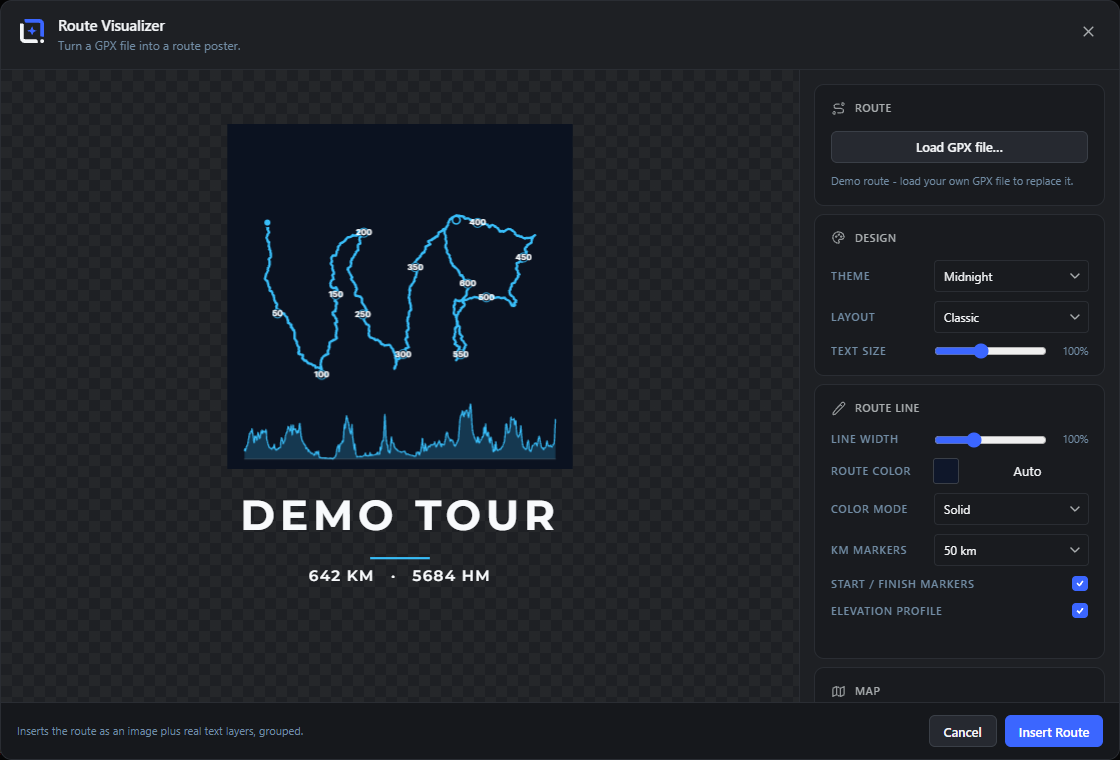
Turn any GPX file into a poster: your run, ride or hike as a clean route line, or as a data line colored by pace, heart rate or elevation read straight from the file, optionally on a real OpenStreetMap street map rendered through the editor's privacy-friendly geo proxy.
An elevation profile, kilometer markers, big race stats for distance, climb, time, pace and date, and poster typography all land as real editable text layers. Themes, line weight, colors and markers are adjustable, and a demo route is built in so you can try it without a file.
Open it from the Extensions menu. Everything is computed locally from your file, and any poster reopens via Edit Route.
Route (load a track) Extension 3 items #
Load a GPX file (or use the built-in demo) to turn a run, ride, or hike into a poster.
Route Visualizer opens as a dialog with a live poster preview on the left and setting cards on the right. The first card, Route, is where you bring in the track the whole poster is built from.
On first open the studio already shows a built-in demo route so you can see a finished poster right away. Loading your own GPX file replaces it.
Load GPX file…
#Opens your computer's file picker so you can choose a .gpx track exported from a watch, phone, or fitness app. The track's points, distance, elevation, and timestamps drive the whole poster.
Tip. If the file has no track points you get a "No track points in that file." message and nothing changes.
Demo route
#A sample track that is loaded automatically the first time you open the studio, so the preview is never empty. Load your own GPX file to replace it.
Route summary line
#A small line under the load button that confirms the loaded track. It shows the track name, the total distance, and how many points remain after simplification.
Design (theme, layout, text size) Extension 3 items #
Pick the poster's color theme, where the text sits, and how big the type is.
The Design card sets the overall look: the color theme that tints the map and text, the layout that decides where the title block lives, and a text size multiplier.
Theme
#Chooses a named color preset that sets the background, route line, and text colors together. Switch themes to restyle the whole poster in one step.
Tip. The theme also sets the default route color, which you can override under Route line.
Layout
#Decides where the title, stats, and date sit relative to the map square. Classic puts a centred text block below the map; the corner options tuck the text into a top corner of the map; No text shows the route square only.
Tip. Corner layouts place text in the top corners on purpose, because the elevation strip owns the bottom of the square.
Text size
#Scales every text element on the poster (title, subtitle, stats, date) up or down together. Use it when the title feels too small or too shouty for the layout.
Route line (color, width, markers) Extension 7 items #
Style the route line itself: width, color, data-driven coloring, distance markers, and the elevation profile.
The Route line card controls the drawn track: how thick it is, what color it uses, whether the color follows your pace, heart rate, or elevation, and the extras drawn along and under it (kilometre markers, start and finish dots, and an elevation profile strip).
Line width
#Sets how thick the route line is drawn, as a percentage of the default weight. Increase it for a bold poster line, decrease it for a fine trace on dense courses.
Route color
#Sets the color of the route line using the editor's color picker. By default it uses the theme's line color until you choose a custom one.
Tip. This control has no effect while a data-driven Color mode (Pace, Heart rate, or Elevation) is active.
Auto
#Clears any custom route color and returns the line to the theme's default color. Sits next to the Route color picker.
Color mode
#Colors the route line by data instead of a single color. Solid uses one color; Pace, Heart rate, and Elevation shade the line along its length by that value, with a min/max legend on the map.
Tip. A data option is greyed out when the track has no data for it; if the current mode loses its data the studio falls back to Solid.
Km markers
#Places small labelled dots along the route at a fixed distance interval. Auto picks the smallest step that keeps the map to about 12 markers.
Tip. Auto steps through 1, 2, 5, 10, 25, 50, 100 km until there are 12 or fewer markers.
Start / finish markers
#Draws a marker at the start point and the finish point of the route. Turn it off for a cleaner line with no end dots.
Elevation profile
#Adds a small elevation profile strip along the bottom of the map square, showing the ups and downs of the course. It is disabled when the file has no elevation data.
Tip. With no elevation in the file you see the note "No elevation data in this file." and the toggle is locked off.
Map (street map background) ExtensionLocal AI 2 items #
Optionally place the route on a real OpenStreetMap street map, fetched through your own server.
The Map card only appears when the editor's geo proxy is available. It lets you draw the route on top of real streets from OpenStreetMap, rendered locally after the map data is fetched and cached on your own server.
Street map background
#Draws the route on top of a real street map instead of a plain themed background. Street data comes from OpenStreetMap, fetched through your own server and cached there.
Tip. The toggle is disabled and turns itself off for very large routes: the street map only covers areas up to about 0.8 degrees across.
Map status line
#A small status line under the toggle that reports what is happening while map data loads. It shows progress, retries, and honest warnings when an area is too large, too dense, or returns nothing.
Text (title, subtitle, stats line) Extension 8 items #
Type the poster's title and subtitle and choose which stats appear in the stats line.
The Text card fills the poster's text block. Enter a title and subtitle, then tick the values you want in the stats line under them. When the track has a name it is used as the title until you type your own.
Title
#The large headline on the poster, usually the route or event name. It is auto-filled from the GPX track name and can be overwritten.
Tip. Titles render in uppercase on the poster.
Subtitle
#A smaller line under the title, for a place, date phrase, or short caption. Leave it empty to hide it.
Stats line
#A header that labels the group of checkboxes below it. The ticked values are joined into a single stats line under the title.
Distance
#Includes the total distance of the route in the stats line. Read from the track.
Elevation gain
#Includes the total metres climbed in the stats line. It only appears when the route actually has a positive elevation gain.
Time
#Includes the moving or elapsed time of the activity in the stats line, when the track has timestamps.
Pace
#Includes the average pace (time per kilometre) in the stats line, calculated from distance and time.
Date
#Adds a separate date line under the stats, showing the day the activity was recorded. It is formatted for your site language.
Insert and close Extension 3 items #
Insert the finished route poster into the document, or cancel out.
The dialog footer explains what will be added and holds the two action buttons. Inserting adds the route as a baked image plus real, editable text and shape layers, grouped together.
Cancel
#Closes the studio without changing your document. The same as pressing Escape, clicking the X, or clicking the dark area outside the dialog.
Insert Route
#Adds the poster to your document: the route square as an image, plus the title, subtitle, stats, date, divider, and attribution as real text and shape layers, all in one group. Disabled until a route is loaded.
Tip. The route image stores its settings, so selecting it later and choosing "Edit Route Visualizer" reopens this studio.
Update Route
#Replaces the button label when you reopen an existing route poster. It re-bakes the image and settings in place instead of inserting a new group.