Motion Graphics
A fullscreen motion studio that composes animated reels, intros and overlays on a real timeline, fully local WebGL with no AI and no uploads.
Studio overview and dialog Extension 7 items #
A fullscreen motion studio that composes animated reels, intros and overlays on a real timeline, fully local WebGL with no AI and no uploads.
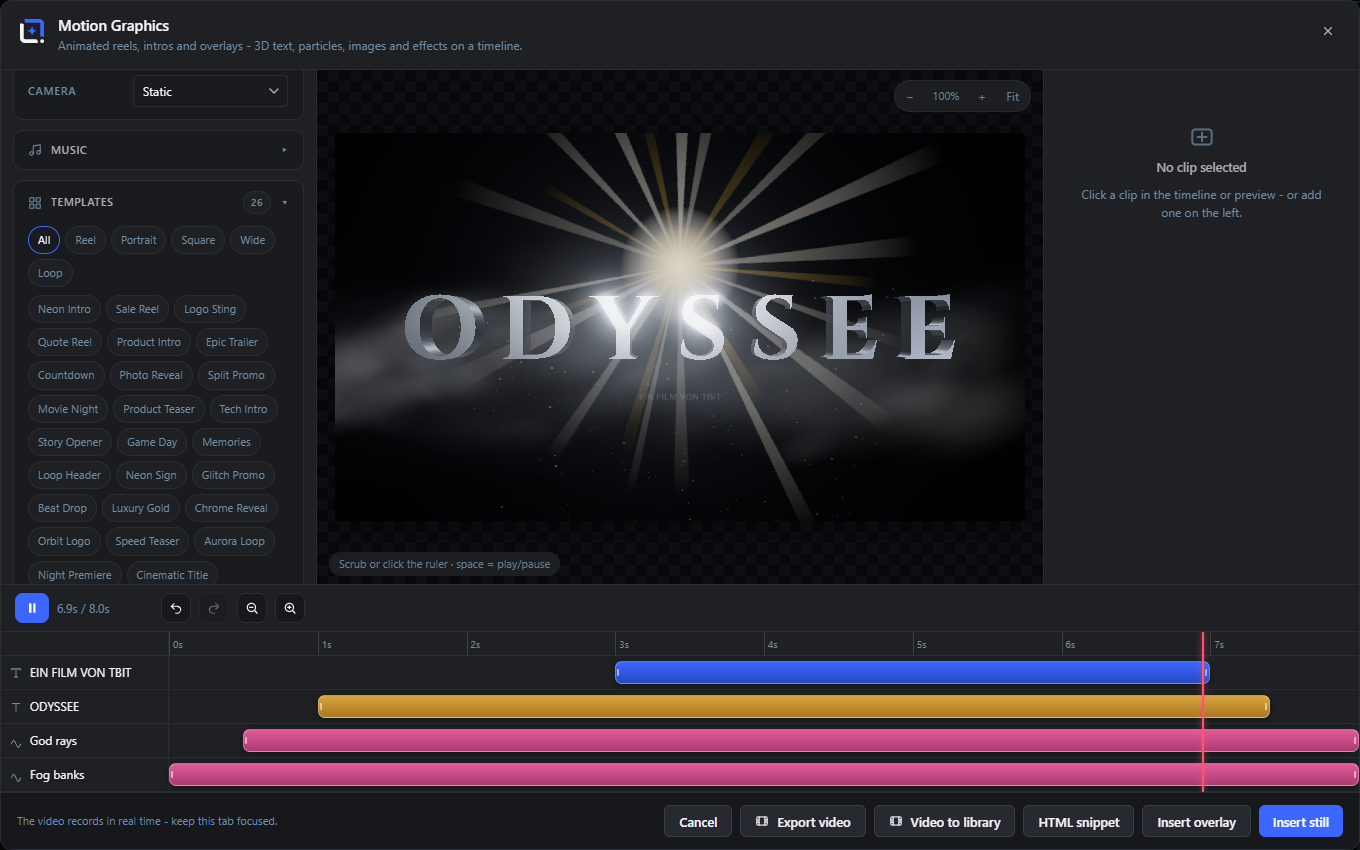
A motion studio inside the editor: compose animated reels, intros and overlays on a real timeline, fully local WebGL with no uploads. Six clip types stack in front of each other: extruded 3D text in premium materials, particle text that gathers out of stardust and disperses again, images with Ken Burns moves and slide transitions, animated backdrops borrowed from the Cinematic Effects motifs, and gradient shapes.
Every clip gets an entrance, an idle behaviour and an exit with proper easing, positioned by dragging bars on the timeline. Pick a platform format such as Reel, Story, Square or widescreen, or simply use the document size, then scrub and play.
Open it from the Extensions menu. Export a WebM video, insert a still as an editable layer, or drop a transparent overlay onto your design.
Motion Graphics (title)
#The dialog header shows the studio name and a short subtitle. In edit mode the subtitle reads Adjust the animation, the layer updates in place, otherwise it describes reels, intros and overlays.
Close
#The X button in the top right closes the studio without inserting anything. Clicking the dark backdrop or pressing Escape does the same.
Scrub or click the ruler · space = play/pause
#A hint shown over the preview. It reminds you that you can drag or click the time ruler to scrub, and that the spacebar starts and stops playback.
Tip. The spacebar only toggles play when you are not typing in a field.
Preview drag to move
#Click a clip directly in the preview frame to select it, then drag to reposition it. Clicking an empty area of the preview deselects the current clip and brings back the Scene panel.
Tip. Dragging in the frame moves the same X and Y you can set with the Position sliders.
Undo (keyboard)
#Steps back one change across the whole scene. Every completed edit is snapshotted, so undo reliably returns the previous state.
Tip. Also available as a toolbar button.
Redo (keyboard)
#Re-applies a change you just undid.
The video records in real time - keep this tab focused.
#A note in the footer. Because export captures the live preview frame by frame, switching away from the tab can drop frames or stall the recording.
Format, duration and playback toolbar Extension 13 items #
The toolbar above the timeline sets the canvas format and length, controls playback, and holds undo, redo and timeline zoom.
This strip sits at the top of the timeline area. It defines the overall shape and duration of the reel and gives you transport controls.
Scenes run at a fixed 30 frames per second.
Format
#A dropdown that sets the canvas aspect ratio and pixel size for the whole scene. Changing it resizes the preview and re-fits everything.
Tip. Document uses the size of the image you are editing.
Reel 9:16
#Tall vertical format for Reels, Stories and TikTok. Sets the canvas to 1080 by 1920 pixels.
Square 1:1
#Square format for feed posts. Sets the canvas to 1080 by 1080 pixels.
Post 4:5
#Portrait feed format. Sets the canvas to 1080 by 1350 pixels.
Wide 16:9
#Landscape format for YouTube, headers and presentations. Sets the canvas to 1920 by 1080 pixels.
Document
#Matches the exact width and height of the image you are editing, so the animation fits your current document.
Duration
#A number field that sets how long the whole reel runs, in seconds. Clip bars that extend past the new end are clamped.
Play / Pause
#Toggles preview playback. The icon switches between a play triangle and a pause bar. The spacebar does the same.
Time readout
#Shows the current playhead position and the total duration, for example 2.4s / 8.0s.
Undo
#Steps back one change. Disabled when there is nothing earlier to return to.
Redo
#Re-applies the last undone change. Disabled at the top of the history.
Timeline zoom out
#Shrinks the timeline back towards the default width so you see the whole reel at once.
Timeline zoom in
#Stretches the timeline wider so short clips and fine timing are easier to grab and adjust.
Add clip bar Extension 6 items #
Six buttons that drop a new clip of a given type onto the timeline at the playhead.
The Add clip row holds one button per clip type. A new clip starts at the current playhead position and runs for about four seconds (clamped to the scene length), then becomes the selected clip so its properties open on the right.
A scene can hold up to twelve clips.
3D text
#Adds an extruded 3D text clip, the kind used for big titles and logos. It starts with the word HELLO.
Caption
#Adds a flat caption clip (a 2D text line or label) for subtitles, tags and small copy.
Tip. Internally this is the text2d clip type.
Particle text
#Adds particle text that gathers out of a cloud of points into a word and can disperse again.
Image
#Adds an image clip with optional mask and Ken Burns moves. You pick the picture after adding it.
Effect
#Adds an animated effect backdrop drawn from the shared effect motif catalog (embers, aurora, galaxy and many more).
Shape
#Adds a solid or gradient shape (rectangle or ellipse) for panels, bars and color blocks.
Timeline (clip bars, ruler, rows) Extension 10 items #
The lower panel where clips appear as bars you drag to move, resize by the ends, and scrub with the ruler.
Each clip is one row. The top row is the front-most clip in the stack. Drag the middle of a bar to move it in time, or drag either end handle to change its start or end. The time ruler along the top scrubs the playhead.
Dragging snaps magnetically to the scene edges and to the start and end of every other clip, so cuts line up cleanly. Timing also snaps to a tenth-of-a-second grid.
Time ruler
#The strip of second marks along the top of the timeline. Click or drag it to move the playhead to any moment. Scrubbing pauses playback.
Tip. You can also drag the empty part of any clip track to scrub.
Clip bar (move)
#The colored bar for a clip. Drag its body to slide the clip earlier or later without changing its length.
Tip. Colors differ by clip type so rows are easy to tell apart.
Left handle
#The grip on the left edge of a bar. Drag it to change the clip start. The start cannot pass within 0.2 seconds of the end.
Right handle
#The grip on the right edge of a bar. Drag it to change the clip end. The end cannot pass within 0.2 seconds of the start.
Magnetic snapping
#While dragging, edges jump to nearby snap points: the scene start, the scene end, and the start and end of every other clip. This makes clips butt up or align without fiddling.
Row label and selection
#Each row shows the clip type icon and a name (the clip text, effect motif, or a custom name). Click the label to select the clip and open its properties. Click the active row again to deselect and return to the Scene panel.
Tip. Overlapping clips crossfade where their bars overlap.
Move up
#The up-arrow on a row moves the clip one step forward in the stack, so it draws in front of the next clip.
Tip. The stack order is front to back, top row is front-most.
Move down
#The down-arrow moves the clip one step back in the stack, behind the next clip.
Duplicate
#Copies the clip with all its settings and drops the copy just after it, shifted about 0.3 seconds later. The copy becomes selected.
Remove clip
#Deletes the clip from the scene. If it was selected, the panel returns to the Scene view.
Scene panel (backdrop, look, loop, camera) Extension 9 items #
The panel shown when no clip is selected: it sets the background, the post look, seamless looping and the global camera move.
When nothing is selected, the right panel greets you with Scene settings, the Music track, and the Templates gallery. These apply to the whole reel, not a single clip.
Changing a look setting refreshes the preview after a short debounce.
Backdrop
#The solid background color behind all clips. Opens the editor color picker.
Tip. Effect clips draw on top of this, so a dark backdrop makes glows pop.
Bloom
#How much bright parts of the scene glow and bleed light. Higher values give a dreamier, more cinematic look.
Vignette
#Darkens the corners of the frame to draw the eye to the center. Higher values mean a stronger, moodier edge.
Seamless loop (full-length clips)
#When on, clips that span the entire duration are quantized so the first and last frame match exactly, giving a jump-free repeating loop. Best for headers and backgrounds.
Tip. Combine with the HTML snippet export for a looping web header.
Camera
#A global camera move applied to the whole scene over its length. Adds life without touching individual clips.
Static
#No camera motion. The frame holds still.
Push in
#The camera slowly moves closer over the reel, a classic slow zoom for titles and premieres.
Orbit
#The camera circles the scene, revealing the 3D depth of text and particles. Pairs well with looping logos.
Drift
#A gentle floating drift that keeps the frame subtly alive.
Music (audio track) Extension 7 items #
Add a music or audio track that plays in the preview and is recorded into exported video, with volume, offset, fade and a per-clip beat pulse.
The Music card lives in the Scene panel. Load a track from the media library or your computer. It plays during preview and is captured when you export a video.
A short note above the buttons tells you whether a track is loaded (Track loaded - plays in preview and export.) or not (No music yet - add a track below.).
Media library (music)
#Opens the WordPress media library filtered to audio, so you can pick a track already on your site. Shown only when the media library is available.
Tip. Only appears when the WordPress media frame is present.
Upload (music)
#Opens a file picker to load an audio file from your computer as the track. The file is read directly into the scene.
Remove (music)
#Clears the loaded track. Shown only once a track is present.
Tip. Volume, offset and fade controls appear only while a track is loaded.
Volume
#How loud the track plays in preview and export.
Track offset (s)
#How many seconds into the audio file playback should begin, so you can skip an intro and start on the part you want.
Fade out at the end
#When on, the music fades down to silence as the reel reaches its end instead of cutting off abruptly.
Beat pulse (music)
#A per-clip checkbox in the clip Timing card. When on, that clip throbs its scale in time with the music, so titles and shapes pulse on the beat. Needs a loaded track to react.
Tip. Turn it on for the main title, off for supporting text, so the beat has a focal point.
Templates (starter reels) Extension 26 items #
A gallery of ready-made scenes; one click loads a complete, self-contained reel you can then edit.
The Templates card in the Scene panel lists starter reels. Clicking one replaces the whole scene with that template and starts playing so you can see it immediately.
Templates with an image clip use an empty photo placeholder, so you drop your own picture in afterwards. Copy is often shown in German as an example and can be edited on any clip.
Neon Intro
#A synthwave-grid backdrop with a zooming NEON 3D title and a NIGHT DRIVE caption. Good for music and nightlife intros.
Sale Reel
#A fiery vertical promo with a bouncing gold SALE title and a red discount pill. Built for sale announcements.
Logo Sting
#A short square sting where a LOGO gathers from particles over a violet galaxy and disperses. A quick brand bumper.
Quote Reel
#A calm portrait quote card with a typewritten serif quote over drifting fireflies. Good for inspirational posts.
Product Intro
#A vertical product opener with a chrome NEU title on an ellipse plate and a call-to-action pill. Drop in a product below.
Epic Trailer
#A dark, heavily vignetted trailer with fog, embers and a slow gold LEGACY title. Cinematic and dramatic.
Countdown
#A 3, 2, 1 neon countdown that bursts into fireworks and a gold GO!. For launches and go-live moments.
Photo Reveal
#A wide layout with a circle-masked photo sliding in with a Ken Burns move next to a REVEAL title. Add your photo.
Split Promo
#A split square layout with a rounded photo on one side and a candy SALE title plus caption on the other.
Movie Night
#A moody cinema look with god rays, smoke and a copper PREMIERE title with a gold info pill.
Tech Intro
#A toxic-green circuit and hologram backdrop with a typewritten SYNTAX title and a terminal-style caption.
Story Opener
#A vertical story cover with an aurora backdrop, a circle-masked photo and a Es war einmal ... line. Add your photo.
Game Day
#A high-energy sports promo with steel GAME DAY text that pulses to the beat and a red kickoff pill.
Memories
#A warm keepsake reel that crossfades two rounded photos over fireflies with a floating serif line. Add two photos.
Loop Header
#A seamless looping website header with a silk backdrop, a shine-swept gold STUDIO title and a floating tagline. Loop and drift camera are on.
Tip. Pair with the HTML snippet export.
Neon Sign
#A neon OPEN sign that flickers on over a city backdrop with a 24 / 7 caption. For shops and venues.
Glitch Promo
#A glitchy tech promo where a steel SYSTEM title glitches in on the beat over an electric glitch effect.
Beat Drop
#A vertical music reel with audio bars and a wavefield, a candy DROP title and captions that pulse to the beat.
Tip. Add a music track to feel the beat pulse.
Luxury Gold
#An elegant wide reel with fireflies, a shine-swept gold ELEGANCE title and a small serif subline, with a slow push-in camera.
Chrome Reveal
#A square reveal with a chrome TITAN title cascading in with a shine sweep and a supporting caption.
Orbit Logo
#A seamless looping logo bumper: a particle LOGO shimmering over a galaxy while the camera orbits.
Aurora Loop
#A seamless vertical loop with an aurora and fireflies and a floating Nordlichter serif line. Calm and ambient.
Night Premiere
#A portrait premiere card with rays and smoke, a flickering copper NACHT title and a showtime pill, with a push-in camera.
Cinematic Title
#A film-title look with fog and god rays and a slowly extruding steel ODYSSEE title over a credit line.
3D text clip Extension 7 items #
An extruded 3D text clip for big titles and logos, with the editor's fonts, twelve materials and depth.
Select a 3D text clip to open these controls at the top of the properties panel, above the shared Position, Motion and Timing cards.
3D text supports the richest set of entrance moves, including letter cascades, typewriter, extrude grow, neon flicker and glitch in.
Text
#The words to render in 3D. Line breaks are kept.
Font
#The typeface for the 3D letters. The list holds the studio's built-in display fonts (Anton, Bebas Neue, Cinzel, DM Serif, Fredoka, Bangers, Lobster, Pacifico and more) plus up to forty of your editor fonts.
Material
#The surface look of the extruded letters. Twelve premium presets cover metals, glass, neon and more.
Face color
#Overrides the color of the front face of the letters. Opens the editor color picker.
Tip. Leave the material default to keep the preset's own coloring.
Depth
#How far the letters extrude towards the camera. Higher values look chunkier and more three-dimensional.
Spacing
#The gap between letters (tracking). Negative values tighten the word, positive values spread it out.
Stagger
#How much the per-letter timing is offset during animated entrances like the letter cascade. Higher values make letters arrive more spread out in time.
Caption clip (2D text) Extension 14 items #
A flat text line for subtitles, tags and small copy, with four font families, four styles and an optional pill background.
Select a caption clip (the text2d type) to edit these controls. Captions render as crisp flat text, ideal over photos and effects.
The caption text field is a two-row textarea, so you can add line breaks.
Text (caption)
#The caption copy. Supports multiple lines.
Font (caption)
#The font family for the caption.
Sans
#A clean sans-serif (Helvetica Neue or Arial). The default, good for most captions.
Display
#A heavy display face (Arial Black or Impact) for bold, punchy labels.
Serif
#A classic serif (Georgia or Times New Roman) for editorial and elegant lines.
Mono
#A monospace face (Courier New) for code, timers and terminal looks.
Style
#How the caption is decorated. Choosing Pill reveals a pill color control.
Plain
#Plain colored text with no outline, shadow or background.
Outline
#Text with a stroked outline for contrast over busy footage.
Shadow
#Text with a drop shadow so it stays legible over bright areas.
Pill
#Text sits inside a rounded filled pill. Adds a Pill color control for the background.
Color
#The text color of the caption.
Pill color
#The fill color of the pill background. Shown only when the Pill style is selected.
Size
#The caption font size in scene units. Larger values fill more of the frame.
Particle text clip Extension 4 items #
Text that gathers out of a cloud of glowing points and can disperse back into stardust.
Select a particle text clip to edit these controls. It reads best as a short word or two.
Particle text uses the gather entrance and disperse exit, with a shimmer idle.
Text (particle)
#The short word the particles form. Kept brief for a clean gather effect.
Color (particle)
#The color of the particles.
Density
#How many particles make up the text. Higher values give a denser, more solid word but cost more to render.
Particle size
#The size of each point. Larger particles look bolder and blur together, smaller ones look finer and more starry.
Image clip Extension 9 items #
A photo clip with an optional mask, Ken Burns and pan idle moves, and three ways to load the picture.
Select an image clip to edit these controls. Until you load a picture, a note reads No image yet - import one below. and the import buttons appear.
Image clips can slide, zoom and fade in, and their idle behaviours include Ken Burns push and pull and sideways or vertical pans.
Mask
#Crops the image into a shape. Use it to make circular avatars, rounded cards or soft ellipses.
None (mask)
#No mask, the full rectangular image is shown.
Circle
#Crops to a perfect circle, ideal for profile photos and logos.
Rounded
#Crops to a rounded rectangle for a soft card look.
Ellipse
#Crops to an oval that follows the image aspect.
Image preview
#Once a picture is loaded, a thumbnail preview of it shows in the panel so you can confirm the right image is set.
Tip. Reposition and scale the photo with the shared Position sliders or by dragging it in the frame.
Media library (image)
#Opens the WordPress media library filtered to images. Prefers the large size of the chosen picture. Shown only when the media frame is available.
Active layer
#Captures the currently selected layer from the editor and uses it as the image, so you can animate a design element you already made. Warns if no layer is selected.
Tip. Renders just the active layer to a PNG and imports it.
Upload (image)
#Opens a file picker to load an image from your computer.
Effect clip (motif backdrop) Extension 7 items #
An animated effect backdrop that draws any of the sixty-plus Cinematic Effects motifs, colored by palette or a custom color.
Select an effect clip to edit these controls. Effect clips are usually the bottom of the stack, providing an animated background behind text and photos.
The motif list is the shared effect catalog: over sixty motifs across families such as Energy, Light, Atmosphere, Cosmos, Retro, Wonders, Fluid and Waves. Effects run a continuous native loop as their idle, so they never freeze.
Motif
#Which effect to draw. The dropdown offers the full motif catalog (embers, aurora, galaxy, fog, synthwave grid, fireworks, audio bars and many more), excluding the standalone particle formation motif.
Tip. See the Cinematic Effects for the full motif descriptions.
Palette
#The color scheme the motif uses.
Intensity
#How strong and dense the effect is (its amount of particles, brightness or coverage). Higher fills the frame more.
Size
#The scale of the effect features, for example particle size or pattern scale.
Tempo
#How fast the effect animates. Higher values move quicker.
Custom color
#Tints the effect with a single color of your choice, overriding the palette. Opens the editor color picker.
Palette colors
#A button that clears the custom color and returns the effect to its palette coloring.
Tip. Use it to undo a custom tint without hunting for the original color.
Shape clip Extension 6 items #
A solid or gradient rectangle or ellipse for panels, bars, plates and color blocks.
Select a shape clip to edit these controls. Shapes are handy as backing plates behind text, split-screen panels or lower-third bars.
Give the same color to both color fields for a flat fill, or two different colors for a gradient.
Shape
#Whether the clip is a rectangle or an ellipse.
Color
#The main fill color, and the start color of a gradient.
Gradient to
#The second color for a gradient fill. Set it the same as Color for a flat fill.
Tip. Defaults to match the main color, so shapes start flat.
Width
#The shape width as a percentage of the frame.
Height
#The shape height as a percentage of the frame.
Corner
#The corner rounding for a rectangle. Higher values round the corners more. Has no visible effect on an ellipse.
Position and transform (per clip) Extension 7 items #
The Position card shared by every clip: place it in the frame, scale it, rotate it flat or in full 3D, and set its opacity.
The Position card appears for every selected clip, below the type-specific controls. Values are percentages of the frame or degrees.
The two 3D rotation sliders turn the clip in space, which is especially striking on 3D text and shapes.
X
#Horizontal position of the clip. Negative moves left, positive moves right. You can also drag the clip in the preview.
Y
#Vertical position of the clip. Negative moves down, positive moves up.
Scale
#The overall size of the clip as a percentage. 100 is normal, higher enlarges, lower shrinks.
Rotation
#Flat in-plane rotation (roll), spinning the clip like a clock hand.
Turn (3D)
#Yaw: turns the clip left and right around its vertical axis, showing its 3D side. Great on extruded text.
Tilt (3D)
#Pitch: tips the clip forward or back around its horizontal axis.
Opacity
#How see-through the clip is. 100 is fully opaque, 0 is invisible.
Motion drift (per clip) Extension 4 items #
The Motion card animates a clip from its base transform to an end offset across its whole length, a lightweight keyframe move.
The Motion card appears for every selected clip, below the Position card. It adds a slow continuous drift on top of the entrance and exit, so a clip can gently move or grow while it is on screen.
Set any drift to zero to leave that axis unchanged.
Drift X
#How far the clip slides horizontally from start to end of the clip. Positive drifts right, negative drifts left.
Drift Y
#How far the clip slides vertically over its length. Positive drifts up, negative drifts down.
Drift scale
#How much the clip grows or shrinks over its length. Positive values slowly enlarge it, negative values shrink it.
Easing (motion)
#The speed curve of the drift, controlling whether the move accelerates, decelerates or runs steadily.
Timing (entrance, idle, exit) Extension 9 items #
The Timing card shared by every clip: it shows the clip's start and end and sets its entrance, idle and exit animations with duration, easing and speed.
The Timing card appears for every selected clip. The available entrance, idle and exit animations differ by clip type, so the dropdowns only list moves that make sense for that clip.
The idle clock starts only after the entrance finishes, so a looping idle does not fight the reveal.
Start / End
#A read-only readout of when the clip begins and ends, for example 0.4s - 7.6s. Change these by dragging the clip bar on the timeline.
Tip. Drag the bar body to move, or an end handle to resize.
Entrance
#How the clip appears at its start. The options depend on the clip type (for example 3D text can rise, drop, zoom, cascade, typewriter, extrude grow, flicker or glitch in).
Anim duration (entrance)
#How long the entrance animation takes, in seconds. It is capped to at most 60 percent of the clip length.
Easing (entrance)
#The speed curve of the entrance, from a smooth glide to an overshoot or a bounce.
While
#The idle behaviour that plays continuously while the clip is on screen, after the entrance. Options depend on type (for example float, wobble, spin, pulse, shine for 3D text, or Ken Burns and pans for images).
Speed
#How fast the idle behaviour animates. Higher values move quicker.
Exit
#How the clip leaves at its end. Options depend on type (for example fade, fall away, zoom or spin for 3D text, disperse for particle text).
Anim duration (exit)
#How long the exit animation takes, in seconds. It is capped to at most 60 percent of the clip length.
Beat pulse (music)
#When on, the clip throbs its scale in time with the loaded music track. Needs a track to react.
Easing curves Extension 6 items #
The six speed curves offered by every easing dropdown (entrance, exit and motion drift).
Easing shapes how an animation accelerates and decelerates. The same six curves appear wherever an Easing control is shown.
Smooth out
#Starts fast and eases to a gentle stop. The default for most entrances and exits.
Smooth in-out
#Eases in and out, slow at both ends and quick in the middle. Feels balanced and natural.
Smooth in
#Starts slow and accelerates into the move. Good for exits that speed away.
Overshoot
#Overshoots the target slightly then settles back, giving a snappy, springy feel.
Bounce
#Lands with a bouncing settle, like an object dropping and rebounding.
Linear
#Constant speed with no acceleration. Best for typewriter and mechanical moves.
Animation catalog (entrance, idle, exit moves) Extension 28 items #
Every named animation move that can appear in the Entrance, While (idle) and Exit dropdowns, with what each does and which clips offer it.
The Entrance, While and Exit dropdowns list moves that suit the clip type, so not every move appears on every clip. This catalog explains each one.
Entrance and exit moves have a duration and easing; idle moves have a speed.
None
#No animation for that slot. The clip simply appears, holds, or cuts out with no move. Available on every clip and every slot.
Fade
#Fades opacity in or out. The most universal entrance and exit, available on every clip type.
Rise up
#3D text rises up into place from below as it enters.
Drop in
#3D text drops in from above, often paired with a bounce easing.
Zoom
#Scales the clip up on entry or away on exit. Available on 3D text, captions and images.
Spin
#Rotates the clip. As an idle it spins continuously; as an exit it spins away. Used by 3D text.
Letter cascade
#3D text letters arrive one after another in a staggered cascade. The Stagger control tunes the spread.
Typewriter
#Reveals the text character by character like typing. Available on 3D text and captions. Pairs best with Linear easing.
Extrude grow
#3D text grows its depth from flat to full extrusion as it enters, a slow cinematic build.
Neon flicker
#3D text flickers on like a neon sign warming up.
Glitch in
#3D text glitches and jitters into place with a digital distortion.
Particle gather
#Particle text gathers out of a scattered cloud into the word.
Particle disperse
#Particle text scatters back into drifting points as it leaves.
Slide left
#The clip slides in from the right, moving left into place (or off to the left on exit). Available on captions, images and shapes.
Slide right
#The clip slides in from the left, moving right into place (or off to the right on exit). Available on captions, images and shapes.
Slide up
#The clip slides in from below (or out upward on exit). Available on captions and images.
Wipe
#A shape wipes open to reveal itself, like a growing bar.
Fall away
#3D text falls away out of frame as it exits.
Float
#A gentle continuous floating bob while the clip is on screen. Idle for 3D text and captions.
Wobble
#A soft wobbling sway. Idle for 3D text.
Pulse
#A steady scale pulse (breathing). Idle for 3D text, captions and shapes.
Shimmer
#Particles twinkle and shimmer while the word holds. Idle for particle text.
Shine sweep
#A bright highlight sweeps across the 3D letters, like light glinting off metal. Idle for 3D text.
Ken Burns in
#Slowly pushes into the photo (zoom in) while it holds. Idle for images.
Ken Burns out
#Slowly pulls back from the photo (zoom out) while it holds. Idle for images.
Pan sideways
#Slowly pans the photo left and right. Idle for images.
Pan vertical
#Slowly pans the photo up and down. Idle for images.
Native loop
#The only idle for effect clips: the effect runs its own continuous animation loop so the backdrop is always moving.
Export and insert (footer) Extension 6 items #
The footer actions: cancel, export a WebM video, save the video to the media library, copy an HTML embed, and insert the result as a still or transparent overlay.
The footer holds every way to get your reel out of the studio. Video is recorded from the live preview in real time, so keep the tab focused while it records.
Insert actions add a still frame to your design as a layer that stays editable, since the scene is stored with the layer and reopens in this studio.
Cancel
#Closes the studio without inserting or exporting anything.
Export video
#Records the reel (with music) and downloads it as a WebM video file. The button shows Recording… while it captures in real time.
Tip. Keep the tab focused during recording so no frames drop.
Video to library
#Records the reel and uploads it straight into your WordPress media library instead of downloading it, ready to attach to posts.
HTML snippet
#Copies an HTML embed snippet to your clipboard. Paste it into an HTML block on your site to run the scene live and looping in the browser (audio is stripped from the embed). Hidden if the runtime script is unavailable.
Tip. Best paired with a Seamless loop scene for headers.
Insert overlay
#Inserts a still frame with a transparent background as a layer, so the animation motifs sit on top of your existing design.
Insert still / Update layer
#The primary button. For a new scene it inserts the current frame as an editable image layer centered in the document. When editing an existing studio layer it reads Update layer and rewrites that layer in place.
Tip. The frame shown is whatever moment the playhead is on, so scrub to the pose you want first.
Add clip and timeline interactions Extension 6 items #
The controls that create new clips and the click and drag interactions in the preview and on the timeline that were not covered elsewhere.
The Add clip row sits in the timeline toolbar. Next to it, the preview frame and the timeline both respond to clicks: you can grab a clip right in the frame, click empty space to step back to the Scene panel, or click an empty part of a track to move the playhead.
Add clip
#A toolbar row with six buttons, one per clip type (3D text, Caption, Particle text, Image, Effect, Shape). Clicking a button drops a new clip of that type onto the timeline and selects it so its properties open on the right.
Tip. A new clip starts at the playhead, so scrub to where you want it before adding.
Click a clip in the preview
#Clicking directly on a clip in the preview frame selects it and opens its properties, the same as clicking its timeline row. This is the pick step that precedes dragging it to a new spot.
Tip. After selecting, drag inside the frame to reposition (see Preview drag to move).
Click empty preview to deselect
#Clicking an empty part of the preview (where no clip sits) clears the selection and brings the Scene, Music and Templates panel back on the right. Use it to get out of a clip's properties quickly.
Click empty track to scrub
#Clicking an empty area of any clip's timeline row (not on the clip bar itself) moves the playhead to that time and pauses playback. It is the same scrub you get from the time ruler, available on every row.
Playhead
#The vertical line across the timeline that marks the current time. It tracks playback and moves when you scrub the ruler or a track, and its position stays in step with the timeline zoom.
Escape
#Pressing the Escape key closes the studio without inserting anything, the same as the Close or Cancel buttons. Any unsaved animation in the dialog is discarded.
3D text materials Extension 12 items #
The full option list of the Material dropdown on a 3D text clip, twelve surface presets that set how the extruded letters catch light.
The Material control on a 3D text clip picks one of twelve surface presets. Each preset sets the base look (metal, glass, glow and so on). You can still override the front tint with the Face color control after choosing a material.
These are the same twelve presets as the 3D Text Studio extension.
Gold
#Warm, reflective gold metal. This is the default material for a new 3D text clip and suits premium, luxury or celebratory titles.
Chrome
#A polished, mirror-like silver metal that reflects the scene around it. Good for sleek, high-tech or automotive looks.
Copper
#A warm reddish-brown metal, softer and more vintage than gold or chrome. Fits retro, artisan or premiere styling.
Steel
#A cool grey brushed-metal look with muted reflections. Works for industrial, sports or utilitarian headlines.
Glass
#A clear, transparent glass surface that lets the backdrop show through the letters. Use it for light, airy or elegant titles.
Frosted
#A translucent, matte frosted-glass look, softer and cloudier than clear glass. Good for gentle, premium overlays.
Neon
#A glowing, emissive neon-tube look that reads as its own light source. Best on dark backdrops for nightlife, gaming or club styling.
Tip. Pairs well with the Neon flicker entrance and a dark Backdrop.
Gloss
#A shiny, colored lacquer or plastic finish with a bright highlight. A versatile, punchy look that takes the Face color well.
Matte
#A flat, non-reflective finish with no highlights. Use it when you want the text color to stay even and calm without glare.
Candy
#A bright, glossy candy-coat look with a saturated, playful sheen. Suits fun, youthful or promotional titles.
Hologram
#An iridescent, rainbow holographic surface that shifts color across the letters. Great for tech, futuristic or Y2K styling.
Gradient
#A two-tone color gradient that blends across the letters instead of a single flat tint. Use it for modern, colorful headlines.
Shape type Extension 2 items #
The two options inside the Shape dropdown on a shape clip.
A Shape clip draws a solid or gradient block behind or beside your text. The Shape dropdown chooses its outline.
Rectangle
#Draws the shape clip as a rectangle. This is the default. Combine it with the Corner control to round its edges into a pill or card.
Ellipse
#Draws the shape clip as an oval or ellipse instead of a rectangle. Use it for badges, spotlights or soft backing shapes. This is the shape outline, separate from the image Mask ellipse option.
Notes and status messages Extension 7 items #
The inline hints, empty-state notes and feedback messages the studio shows, none of which are buttons but each of which tells you the current state.
These strings appear in panels, on export buttons and as toasts. They are not controls you click, but they explain what the studio is doing or what it needs from you.
Adjust the animation, the layer updates in place.
#The subtitle shown under the title when you reopen the studio on an existing 3D Animation layer. It signals edit mode: your changes overwrite that layer instead of adding a new one, and the primary button reads Update layer.
Track loaded - plays in preview and export.
#A note in the Music panel confirming a music track is attached. The track plays during preview and is recorded into the exported video.
No music yet - add a track below.
#The empty-state note in the Music panel when no audio is attached. Use the Media library or Upload buttons below it to add a track.
No image yet - import one below.
#The empty-state note inside an Image clip's properties when it has no picture. Pick one with Media library, Active layer or Upload.
Recording…
#The temporary label shown on the Export video and Video to library buttons while the reel is being captured. Recording happens in real time, so the wait roughly matches the clip's duration.
Tip. Keep this browser tab focused while it records.
Select a layer in the editor first.
#An error toast shown when you press Active layer inside an Image clip but no layer is selected back in the editor. Select a layer, then try again to pull it in as the clip's picture.
Motion Graphics needs WebGL.
#An error toast shown if the studio cannot start because the browser or device has no working WebGL. The dialog closes because the 3D preview and export both require it.